How to add free vpn in Windows 11 - free vpn for Windows 11
If you looking to connect to a VPN service manually, Let's start how to connect VPN on Windows 11.
On Windows 11, the VPN gate (virtual private network) services provide free VPN Server link to connect quickly to their private networks. They also prove how to configure vpn.
In this Windows 11 guide, we will show step by step process to manually configure a free VPN server, connect, disconnect, and how to delete a VPN connection.
How to set up a VPN connection on Windows 11
1. Open Settings.
2. Click on Network & internet.
3. Click the VPN page from the right side.
4. In the "VPN connections" setting, click the Add VPN button.
5. Use the "VPN provider" drop-down menu and select the Windows (built-in) option.
6. In the "Connection name" setting, insert a name as you identify the connection — for example, you can use the service name like Free VPN, Private Network, etc.
7. In the "Server name or address" setting, insert the address of the VPN server — for example, xxx.opengw.net or :port number.
8. Use the "VPN type" drop-down menu and select the Secure Socket Tunneling Protocol (SSTP) option.
9. Use the "Type of sign-in info" drop-down menu and select the authentication method as username & password.
10. Insert the username and password. (Username - vpn & Password - vpn)
11. Click the Save button.
Let's connect a VPN connection on Windows 11
1. Open Settings.
2. Click on Network & internet.
3. Click the VPN page from the right side.
4. Click the Connect button for the connection
Wait to connect to the server.
After successfully connecting to the server. Check the connection from the taskbar.
1. Click the network icon in the Taskbar
2. Check the VPN Connection Status.
How to disconnect a VPN connection on Windows 11
1. Open Settings.
2. Click on Network & internet.
3. Click the VPN page from the right side.
4. Click the Disconnect button.
5. Click the Confirm button.
Let's remove a VPN connection on Windows 11
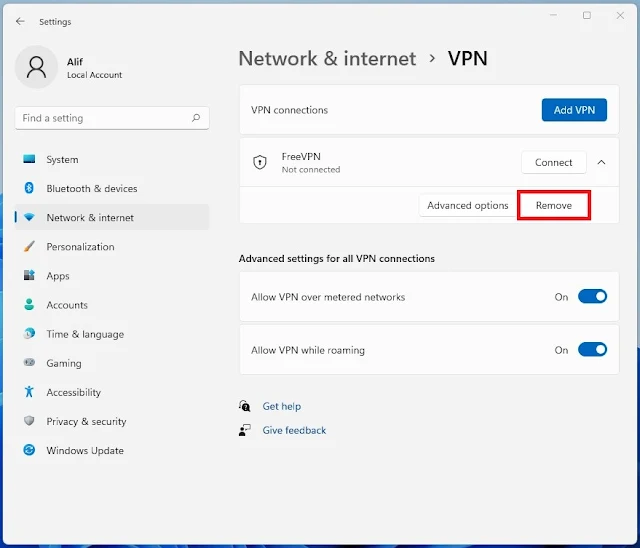
To remove /delete a VPN connection, follow the below steps:
1. Open Settings.
2. Click on Network & internet.
3. Click the VPN page from the right side.
4. Click the connection to access its settings.
5. Click the Disconnect button (if applicable).
6. Click the Remove button.
Watch a videos to more details -


Comments
Post a Comment